
Build a RESTful API With Nodejs, Express, And MongoDB: Step-by-Step Guide

Backend Engineer and Technical writer. Passionate about technologies, love to learn and share.
A REST API uses standard HTTP methods such as GET, POST, PUT, DELETE, and so on, to perform CRUD (create, read, update, and delete) operations on data exposed as resources in an API.
In this tutorial, we will build a REST API for a blog app using Nodejs and Express. A couple of features we want this API to have includes:
A user should be able to sign up and log in to the blog app
Anyone (registered and non-registered users) can view all published posts.
Only authenticated users can create a post.
A post can exist in two states — draft or published. When a post is newly created, it should be in a draft state
An authenticated user should be able to access all his posts (both drafts and published).
Only the author of a post can edit and update the state of the post.
Each created post should have a calculated read time.
To store data, we will be using MongoDB while NodeJs and Express will be used to create the server API.
I hope you will have fun building with me, so without further ado, let’s get started already!
Prerequisite
To follow along with this tutorial, you should have the following:
NodeJs installed on your device.
A basic understanding of NodeJs, Express, and MongoDB.
Postman or Thunderclient installed.
Knowledge of using the terminal.
Getting Started with the Project
Step 1: Project set up
First, create a new directory, blogAPI, and navigate into it. In your terminal, run the following command:
$ mkdir blogAPI && cd blogAPI
Next, initialize the project by entering the following command:
npm init -y
This will generate a package.json file as shown below. This file contains metadata about the project. The flag -y means we accept all default values.

Step 2: Install project dependencies
For this project, we would need to install some libraries. While still in the project directory, run this command in your terminal:
npm install express mongoose dotenv bcrypt validator jsonwebtoken
Now open the project folder in your preferred text editor. If you're using vscode, run:
$ code .
Step 3: Organize folder structure
We will be using MVC (model, views, controllers) architectural style to structure the folders in this project.
Note: We won't be including a views folder since our implementation focuses on just the API.
Create the following folders and files in the root folder as seen below:
├── blogAPI
│    ├── controller/
│    ├── config/
│    ├── model/
│    ├── routes/
│    ├── server.js
|    ├── app.js
|    ├── db/
|    ├── .gitignore
|    ├── .env
├    ├── package.json
These folders will contain other various modules/files we will be creating in this project.
The server.js will serve as the entry point for this application. So replace the value of main in your package.json with server.js
Step 4: Setting up the Database
We will use MongoDB atlas for the database. MongoDB Atlas lets you create a database cluster in the cloud.
If you don’t already know how to get started on Atlas, follow this guide to see how to set up an account, create a cluster and get your connection string. Alternatively, you can use MongoDB compass locally.
Once you get your connection string, create a variable in the .env file and assign the connection string to it. Here’s an example:
MONGODB_URL=mongodb+srv://<username>:<password>@cluster0.nskbzpu.mongodb.net/blogAPI?retryWrites=true&w=majority

//blogAPI is the name I assigned my database. Yours could be different.
If you're using MongoDB compass, your connection string will be:
mongodb://localhost:27017/blogAPI
Now we can connect our express application to this database cluster. We will get to this in a bit but first, let’s set up some basic configuration for this app.
Step 5: Setting up app configuration
In the config folder, create a config.js file and include the following:
//import dotenv
require('dotenv').config();

//add app config data
module.exports = {
  MONGODB_URL: process.env.MONGODB_URL,
  PORT: process.env.PORT
}
Ensure to update your .env file with PORT variable. The .env file will contain all our environment variables.
Step 6: Connecting To The Database
In the db folder, create a db.js file and include the following code:
//import mongoose
const mongoose = require('mongoose');

//import config file
const CONFIG = require("./../config/config");

//database connection function
function connectToDB(){
    mongoose.connect(CONFIG.MONGODB_URL);

    //Add event listener to test connection
    mongoose.connection.on('connected', () => {
        console.log('connection to DB successful')
    })
    //catch error
    mongoose.connection.on("error", (err) => {
        console.log('Connection to DB failed')
        console.log(err)
    })
}
//export database connection function
module.exports = connectToDB;
Next up, we create the express application and add some middleware. We will do this in the app.js file. Add the following in the app.js file:
const express = require('express');

//crete express app
const app = express();

//add middleware
app.use(express.json());
app.use(express.urlencoded({ extended: true }));

module.exports = app;
Here, we have included two important body parsing middleware — express.json() which will parse incoming JSON data from the body of a request, and express.urlencoded(), which will parse URL-encoded form data.
Step 7: Server Set up
In the server.js , include the following code:
//import app
const app = require('./app');

//import config module
const CONFIG = require('./config/config');

//import database connection function
const connectToDB = require('./db/mongodb');

//invoke connecToDB function
connectToDB();

app.listen(CONFIG.PORT, () => {
    console.log(`Server is running on http://localhost:${CONFIG.PORT}`)
})
Here, we imported the app configurations and chained the listen method on the app object which will listen for incoming requests on the port we have specified.
Having completed the project setup, we can start implementing the features earlier stated.
Let's break down the requirements we listed into a series of endpoints.
API ENDPOINTS

POST ROUTE
GET /api/posts -------------------(gets all published posts)
POST /api/posts -----------------(create a new post)
PUT /api/posts/:postId ----------(update a post)
DELETE /api/posts/:postId -------(delete a post)
GET /api/posts/:postId ----------(get a single post)

AUTHENTICATION ROUTE
POST /api/auth/signup ----------(sign up a user)
POST /api/auth/login -----------(login a user)

AUTHOR ROUTE
GET /api/author ----------------(get all posts-drafts and published- written by the author)
Let’s now begin implementation.
Step 8: Create the Data Model
At this point, we have only connected our application to the database.
Before populating the database with data, we should first define our data schema.
A schema defines how data is to be stored in the database. For the Post data, we want it to have the following fields — title, description, tags, body, readCount, readTime, state, author, authorId, and createdAt.
Defining the Post Schema and Creating the Post Model
In the model folder, create a new file Post.model.js. Inside this file, we first import the mongoose library.
//Import mongoose
const mongoose = require("mongoose");
mongoose is a MongoDB object modeling mapper for NodeJs that allows us to define a schema to model our application data. Add the following to the existing code in the Post.model.js file
//Define schema
const PostSchema = new mongoose.Schema(
  {
    title: {
      type: String,
      required: [true, "A Blog Post must have a title"],
    },
    description: {
      type: String,
      required: [true, "A Blog Post must have a description"],
    },
    tags: [String],
    readCount: {
      type: Number,
      default: 0,
    },
    author: {
      type: String,
      required: true,
    },
    authorId: {
      type: mongoose.Schema.Types.ObjectId,
      ref: "User",
    },
    state: {
      type: String,
      enum: ["draft", "published"],
      default: "draft",
    },
    body: {
      type: String,
      required: [true, "A Blog Post must contain a body"],
    },
    readTime: {
      type: String,
    },
  },
  { timestamps: true }
);
const Post = mongoose.model("Post", PostSchema);
module.exports = Post;
The Schema() method exposed by the mongoose API lets us define a schema for our data model. Mongoose also provides us with default built-in validations which we have also explored here.
In the PostSchema, we indicated the fields we want each post document to have. In one of the fields, state we used the enum property to define the two possible states a post can have.
Then we created a Post model using the already defined PostSchema and exported it. The Post model object is what the mongoose methods will be chained to.
Defining the User Schema and Creating the User Model
Just as we created the Post model, we will do the same for the User model.
Still in the model folder, add another file User.model.js and add the following code:
const mongoose = require("mongoose");
const validator = require("validator");
const bcrypt = require('bcrypt');

//define schema for user data
const UserSchema = new mongoose.Schema({
  firstname: {
    type: String,
    required: [true, "A user must have a first name"],
  },
  lastname: {
    type: String,
    required: [true, "A user must have a last name"],
  },
  email: {
    type: String,
    required: [true, "A user must have an email"],
    unique: [true, "A user email must be unique"],
    lowercase: true,
    validate: [validator.isEmail, "Please, enter a valid email"],
  },
  password: {
    type: String,
    required: true,
  },
  posts: [
    {
      type: mongoose.Schema.Types.ObjectId,
      ref: "Post",
    },
  ],
});

//add a pre-hook function to the UserSchema. This function gets called before the user info is stored in the database
UserSchema.pre("save", async function (next) {
 //hash incoming password before saving to db
 this.password = await bcrypt.hash(this.password, 12);
 next()
});
//This method will chain a function that compares and validates the password.
UserSchema.methods.isValidPassword = async function (
  currentPassword,
  storedUserPassword
) {
  return await bcrypt.compare(currentPassword, storedUserPassword);
};

//create User model object
const User = mongoose.model("User", UserSchema);
module.exports = User;
Although this is somewhat similar to the Post model, notice we added a few new things here:
a pre-hook middleware: the function of this middleware is to hash the user’s password before saving it to the database and we are using
bcryptlibrary for that.an instance method
isValidPassword: this function compares passwords using thebcryptlibrary too.
With our data model created, let’s now proceed to other implementations.
Step 9: Create the Controllers
The controllers folder will contain our application's business logic which we will eventually mount on the different API routes.
Post Controller
Inside the controllers folder, create a new file, post.controller.js . This file will contain the business logic for all post-related endpoints. In this module, we will implement the following:
Get Posts (all published posts)
Get a single post (with state, published)
Create a Post
Update a Post
Delete a Post
Now let’s implement this one after the other.
First, we import the Post model object like this:
//import the Post model object
const Post = require("./../model/Post.model");
Then we start adding other functions.
GET all posts:
//get all published post
exports.getAllPublishedPost = async (req, res) => {
  try{
    const posts = await Post.find({ state: "published" });

    res.status(200).json({
      status: "success",
      posts,
    });
  } catch(err){
    throw err
  }

};
Here, we are calling MongoDB find() method on the Post model object. Inside the find() method, we passed in a query that will get only posts with the state, published . This find() method will return an array of all posts that match the query passed in.
Next, we assign the result of this query to the variable posts and return it as JSON data in the response object. All of this is assigned to the async function getAllPublishedPost and exported.
GET a single post:
//get a single published post
exports.getASinglePublishedPost = async (req, res) => {
  try{
    const post = await Post.findById(req.params.postId)
    .where("state")
    .eq("published");

    if (!post) {
      return res.status(404).json({
        status: "Failed",
        message: "Post with given Id not found",
      });
    } else {
      //increment the `readCount` property
      post.readCount === 0 ? post.readCount++ : post.readCount++;
      await post.save();
    }

 res.status(200).json({
    status: "success",
    post,
  });
  } catch(err){
    throw err
  }

};
Here, we are querying the database for a single post. We indicate the post by passing its Id as a param in the dedicated route. Then we chained the where() and eq() methods as additional queries to ensure only a post with state equals published is returned.
If the post is not found, we return a 404 not found status or else send back the result post as JSON data in the response object and increment its readCount property by 1.
Create a Post:
//import User model
const User = require("./../model/User.model");

//create a new post
exports.createAPost = async (req, res) => {
  try{
    const { title, description, tags, body } = req.body;

  //calculate read time of post from the body passed in
  const wpm = 225; //wpm => word per minute
  const numberOfWords = body.trim().split(/\s+/).length;
  const readTime = Math.ceil(numberOfWords / wpm);

  //get author name and author Id
  let { firstname, lastname } = req.user;
  let author = `${firstname} ${lastname}`;
  let authorId = req.user._id;
  const post = await Post.create({
    title,
    description,
    tags,
    body,
    author,
    authorId,
    readTime,
  });

  //add the new created post to 'posts' array property on the user document
  let user = await User.findById(req.user._id);
  user.posts.push(post._id);
  await user.save(); //save changes made to the user doc

  //send back response
  res.status(201).json({
    status: "success",
    post,
  });
  } catch(err) {
    throw err
  }
};
In this function, we are doing a couple of things:
First, we destructured the data passed in the request body
Next, we calculated how long it will take to read a post based on the number of words in the post
bodyproperty. We get the number of words by splitting the postbodydata into an array of words and then calculate its length. Then we divide the number of words by the standard word-per-minute, 225, and return the integer value as thereadTimevalue.The
authorandauthorIdvalue is gotten from thereq.userproperty which will be available when we implement the authentication controller. That, in a bit!We then pass our data to the
create()method which is called on thePostmodel object. This will create and save the new document to our database.Also, we import the
Usermodel and then update the user document with the newly created post's Id which is pushed to thepostsarray.Finally, we send back the newly created post as JSON data in the response object.
Update a Post
//update a post
exports.updateAPost = async (req, res) => {
  const { state, body } = req.body;
  try {
    const post = await Post.findByIdAndUpdate(
      req.params.postId,
      {
        $set: {state, body},
      },
      { new: true }
    );
    //check if post belongs to the user initiatin the request
      if (post.authorId.toString() !== req.user._id) {
      return  res.status(401).json({
          status: 'Fail',
          message: `You can only update a post you created!`
        });
      }
    res.status(200).json({
      status: 'success',
      post
    });
  } catch (err) {
    throw err;
  }
};
In this updateAPost function, we are using the findByIdAndUpdate() method to query for the post document in the database using the postId parameter. Then we passed in the values of the properties we want to update using the set operator. And because we want to return the updated version of the post document, we passed in an extra option, {new: true} .
As part of the requirements, we run a check to confirm if the post was created by the current user.
Delete a Post
//delete a post
exports.deleteAPost = async (req, res) => {
  try {
    const post = await Post.findByIdAndRemove(req.params.postId, {
      authorId: req.user.id,
    });
    if(!post) return res.status(404).json({
      status: 'Fail',
      message: 'Post with given Id not found'
    })

    if (post.authorId.toString() !== req.user.id) {
      return res.status(401).json({
        status: "Fail",
        message: `You can only delete a post you created!`,
      });
    }

//delete post from 'posts' array in user the document
    const postByUser = await User.findById(req.user._id);
    postByUser.posts.pull(post._id);
    await postByUser.updateOne({ posts: postByUser.posts });

//return deleted post
    res.status(200).json({
      status: "success",
      message: "Post deleted successfully",
    });
  } catch (err) {
    throw err;
  }
};
This is similar to the previous function, but in this case, we want to delete a post so we call the findByIdAndRemove() method. We pass in the postId as well as an additional query option which checks if the post.authorId is the same as the req.user.id .
Step 10: Implementing User Authentication and Authorization
In line with our requirements, we want our users to have the ability to sign up and log in. Also, protected routes should only be accessible to authenticated users. To implement this, we will create our authentication middleware using the JWT library and assign access tokens to users who have been authenticated.
JWT (JSON Web Token) is a stateless solution for authentication. In the context of REST APIs, a stateless architecture is preferred, and JWT aligns well with this principle.
Create a new file auth.js in the auth folder and add the following code:
const User = require("./../model/User.model");
const jwt = require("jsonwebtoken");
const { promisify } = require("util");

//jwt sign token function
const signToken = (id) => {
  return jwt.sign({ id }, process.env.JWT_SECRET, {
    expiresIn: process.env.JWT_EXPIRES_IN,
  });
};

//sign up a new user
exports.signup = async (req, res, next) => {
  try {
    const newUser = await User.create({
      firstname: req.body.firstname,
      lastname: req.body.lastname,
      email: req.body.email,
      password: req.body.password,
    });

    //assign token to user
    const token = signToken(newUser._id);

    //hide password before returning user's details
    newUser.password = undefined;

    //send back response
    res.status(201).json({
      status: "success",
      token,
      data: {
        user: newUser,
      },
    });
  } catch (err) {
    if (err) return next(err);
  }
};

//log in a user
exports.login = async (req, res, next) => {
  const { email, password } = req.body;
  try {
    //check if user provided email and password
    if (!email || !password) {
      res.status(401).json("Please provide email and password");
      return next(new Error("Please provide email and password"));
    }
    //check if user exist in the database and compare passwords
    const user = await User.findOne({ email });
    if (!user && !(await user.isValidPassword(password, user.password))) {
      res.status(400).json("Incorrect email or password");
      return next(new Error("Incorrect email or password"));
    }
     //assign toke to user
    const token = signToken(user._id);

    res.status(200).json({
      status: "success",
      token,
    });
  } catch (err) {
    throw err;
  }
};

//create an authenticate middleware that will protect routes
exports.authenticate = async (req, res, next) => {
  try {
    let token;
    //Check if token was passed in the header and then retrieve
    if (
      req.headers.authorization &&
      req.headers.authorization.startsWith("Bearer")
    ) {
      token = req.headers.authorization.split(" ")[1];
    }
    if (!token) {
      return next(res.status(401).json("Unauthorized"));
    }
    //verify if token has been altered || if token has expired
    const decodedPayload = await promisify(jwt.verify)(
      token,
      process.env.JWT_SECRET
    );
    //check if user still exist using the token payload
    const currentUser = await User.findById(decodedPayload.id);
    if (!currentUser)
      return next(res.status(401).json("User with this token does not exist"));

    //Assign user to the req.user object
    req.user = currentUser;
    next();
  } catch (err) {
    res.json(err);
  }
};
Here, we have added a couple of functions — signup, login, authenticate . Since the focus of this article is not about JWT, I won't go into detail explaining it, but here's a resource that covers it. The authenticate function is the middleware function that we will use to protect our routes.
Notice how we assigned the value of the current user to the req object. This req.user object then becomes available on any route we pass this authenticate middleware function.
User Controller
As earlier stated, we want an author to be able to access all posts (both draft and published) created by them. To implement this, we will create a new file user.controller.js in the controller folder and add the following code:
//import Post model
const Post = require('./../model/Post.model');

exports.getAllPosts = async (req, res) => {
    try {
      const posts = await Post.find({
        authorId: req.user._id,
      })
      res.status(200).json({
        status: 'success',
        posts,
      });
    } catch (err) {
      throw err;
    }
  };
The getAllPosts function queries the database for all posts specific to the particular author. Now we are accessing the user id from the req.user object and comparing it with the post authorId
With our controller functions ready, we can now mount them on the different API routes and test our endpoints.
Step 11: Creating the API Routes
Navigate to the routes folder and add these two files, post.routes.js and user.routes.js .
In the post.routes.js file, add:
//import express
const express = require('express');

//import Post controller
const postController = require("./../controllers/post.controller");

//import authetication middleware
const authController = require('./../auth/user.auth')

//create router
const router = express.Router();

//API endpoint structure
router.get('/', postController.getAllPublishedPost);
router.get("/:postId", postController.getASinglePublishedPost);
router.put("/:postId", authController.authenticate, postController.updateAPost); //protected route
router.delete("/:postId", authController.authenticate, postController.deleteAPost); //protected route
module.exports = router;
In the user.routes.js , add:
//import express
const express = require('express');

//import user controller
const userController = require("./../controllers/user.controller");

//import authetication middleware
const authController = require('./../auth/user.auth')

//create router
const router = express.Router();

//API endpoint for an author
router.get('/author', authController.authenticate, userController.getAllPosts);

//API endpoint for signup and login
router.post("/auth/signup", authController.signup)
router.post("/auth/login", authController.login)

module.exports = router;
Putting it Altogether
With our routes and controllers in place, we can now bind these different functionalities we’ve implemented to the express app object.
To do that, edit app.js to look like this:
const express = require('express');

//import post router and user router
const postRouter = require('./routes/post.routes');
const userRouter = require('./routes/user.routes')

const app = express();

//add middleware to parse request body
app.use(express.json());
app.use(express.urlencoded({ extended: true }));

//Middleware for API endpoints
app.use("/api", userRouter)
app.use("/api/posts", postRouter)

module.exports = app;
Now, we are ready to test out the endpoints in Postman or ThunderClient.
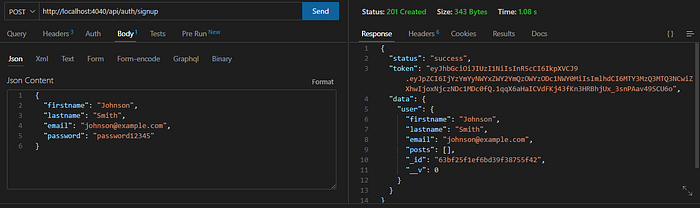
Testing the Signup endpoint:
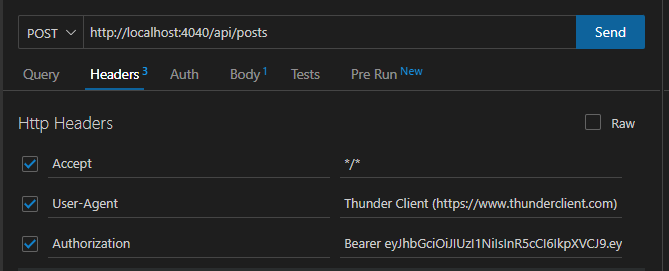
Testing the create post endpoint:
First, we pass in the access token in the authorization header.
Then add the post data in the body of the request:

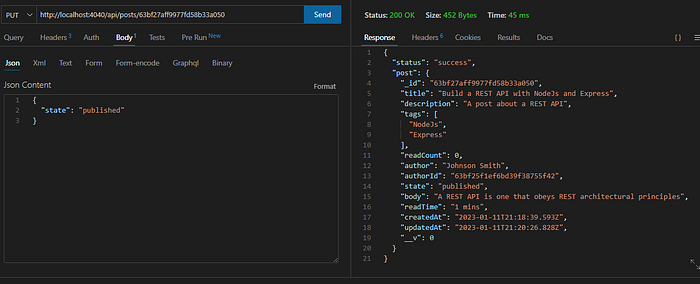
Testing the update a post endpoint:
N.B: I have also included the token value in the authorization header.
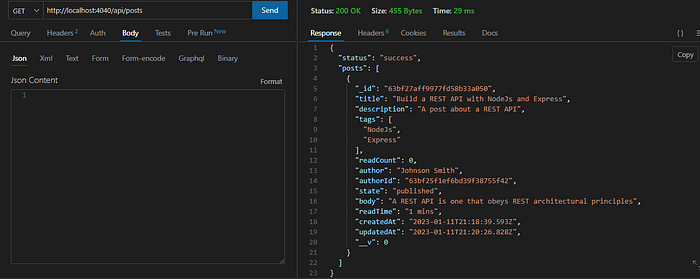
Testing GET all posts endpoint:
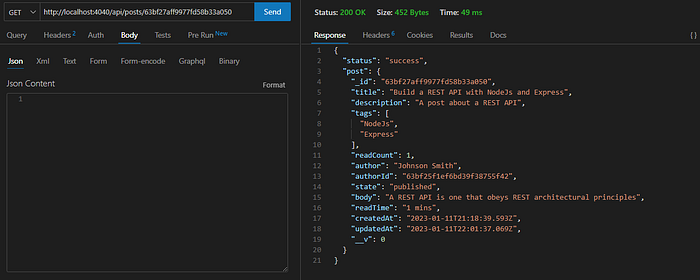
Testing the get a single post endpoint:
Notice how the readCount increased by 1
Conclusion
In this tutorial, you have learned how to build a REST API for a blog using NodeJS, Express, and MongoDB. You also learned how to structure your project using the MVC architectural style.
I hope you enjoyed building along and found this tutorial helpful!
The source code for this tutorial can be found here.
That’s all for this piece. Happy Coding:)


